Alexa Costume
Alexa is a constant presence in my home. She is the one piece of technology that the kids control with impunity. They abuse her with a never-ending barrage of demands to tell jokes and to play their favorite songs again and again. My son’s first words weren’t ‘Mama’ or ‘Dada’ rather they were shouts to command Alexa like his older sister. And so it made perfect sense when my five-year-old daughter, whispering into my ear so as not to be overheard, informed me that she wanted to dress up as Alexa for Halloween this year.
I was onboard with her idea from the start. We began with a trip to Home Depot and found a 10” diameter Sonotube form for pouring concrete footings. With a little spray paint, some mesh fabric and a stencil we had our basic costume. But no Alexa costume could truly be complete without the LED lights animating to attention when the “Alexa” keyword was spoken.
For that, I used a Raspberry PI with a simple program that leveraged Amazon’s Voice Services SDK. By adding a few lines of code to the wake word detector I was able to trigger a separate python program that controlled the LED animations.
Here is a list of components used in the costume.
- 10″ Sonotube
- Rasberry PI 3 running Debian/Stretch
- 5 Volt Battery pack and right angle micro usb connector (RPI Power)
- USB Microphone with usb extension cable
- 12 Volt NeoPixel neon LED strip
- 12 Volt Battery Supply w/ 8 AA batteries (LED Power)
- 18 AWG wire & heat shrink connectors
- Hot Glue
- 2 small straps for suspenders
- Black spray paint & Spary Varnish
- Pack of 6 adhesive backed foot warmers (to keep the costume heated and warm)
SOFTWARE
To get started I followed this basic tutorial for setting up AVS on a Rasberry Pi. With a mic and a speaker plugged in running startSample.sh bash script would launch a working Alexa client. With AVS working, the next step was to create an interface to control the LEDs. I did that with a separate program running on a local flask server with endpoints to animate the neopixel strip.
import time
from flask import Flask
from neopixel import *

app = Flask(__name__)

# LED strip configuration:
LED_COUNT = 14 # Number of LED pixels.
LED_PIN = 10 # GPIO pin connected to the pixels (18 uses PWM!).
LED_FREQ_HZ = 800000 # LED signal frequency in hertz (usually 800khz)
LED_DMA = 10 # DMA channel to use for generating signal (try 10)
LED_BRIGHTNESS = 255 # Set to 0 for darkest and 255 for brightest
LED_INVERT = False # True to invert the signal (when using NPN transistor level shift)
LED_CHANNEL = 0 # set to '1' for GPIOs 13, 19, 41, 45 or 53
CENTER = 7
FALLOFF = round(CENTER * 0.75)

strip = Adafruit_NeoPixel(LED_COUNT, LED_PIN, LED_FREQ_HZ, LED_DMA, LED_INVERT, LED_BRIGHTNESS, LED_CHANNEL)
strip.begin()

isOn = False

# Define functions which animate LEDs in various ways.

def valueMap(value, istart, istop, ostart, ostop):
  return ostart + (ostop - ostart) * ((value - istart) / (istop - istart))

def constrain(val, minval, maxval):
  return min(maxval, max(minval, val))

def alexaOn(strip):
  r1 = 0
  r2 = 200
  g1 = 0
  g2 = 200

  for i in range(0,CENTER+1,1):
    r = constrain(round(valueMap(i,FALLOFF,CENTER,r1,r2)),0,255);
    g = constrain(round(valueMap(i,FALLOFF,CENTER,g1,g2)),0,255);
    col = Color(int(r),int(g),255)
    strip.setPixelColor(i,col)
    second = int(LED_COUNT - i)
    strip.setPixelColor(second, col)
    strip.show()
    time.sleep(20/1000.0)

def alexaOff(strip):
  for i in range(CENTER, 0, -1):
    col = Color(0,0,0)
    strip.setPixelColor(i,col)
    strip.setPixelColor(LED_COUNT - i, col)
    strip.show()
    time.sleep(20/1000.0)
  strip.setPixelColor(0,col)
  strip.show()

@app.route('/on')
def alexa_on():
  if isOn == False:
    isOn = True
    alexaOn(strip)
  return 'Alexa, on'

@app.route('/off')
def alexa_off():
  alexaOff(strip)
  isOn = False
  return 'Alexa, off'

@app.route('/onoff')
def alexa_onoff():
  if isOn == False:
    alexaOn(strip)
    time.sleep(5)
    alexaOff(strip)
  return 'Alexa, onoff'
The neopixel import is from a python library for controlling the neopixels from a RPi. For the most part, the instructions on the repo are easy to follow. I used the SPI interface and controlled the lights on GPIO 10 because this wouldn’t interfere with Audio input. On a RPI 3 this required setting the GPU core frequency to 250 MHz. I’d mistakenly made that edit to the wrong file and it took a lot of hair pulling to identify this as the culprit for my LEDs not cycling correctly.
Another issue I ran into was that the raspberry pi GPIO pins are outputting 3.3 volts. This is not ideal given that the particular LED strip I was using has a 5 volt data input, but I found in practice (probably because my data line was so short) 3.3 volts sufficient. In other scenarios, I would probably have to have used a level shifter, to converts the 3.3 Volt data line up to 5 Volts.
With the flask server setup and running, it was just a matter of adding a system command to execute a local curl request when the wake word was detected. Back in the AVS SDK I found onKeyWordDetected method in SampleApp/src/KeywordObserver.cpp file. After including the <stdlib.h>, I swapped in the following line at the end of that function where it calls notifyOfWakeWord on the delegate.
system("curl -m 2 http://127.0.0.1:5000/onoff");
After that small edit I re-ran cmake to rebuild the project and added the following to my crontab to start up all the services whenever the computer reboots:
@reboot cd /home/pi/ && export FLASK_APP=/home/pi/alexaLedServer.py && python -m flask run
@reboot sudo bash /home/pi/startsample.sh
HARDWARE
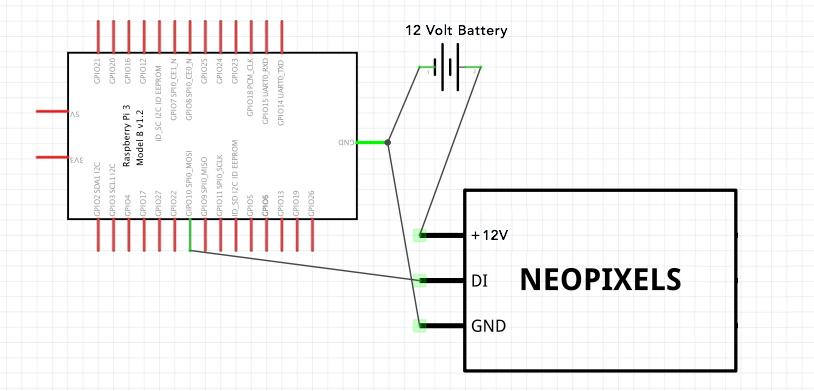
Aside from all the hotglue burns, the hardware setup was a breeze. Here is the wiring diagram for the neopixels which need to share a common ground with the RPi.

The RPi itself is powered from a separate 5Volt micro USB battery pack and the microphone is connected via USB.
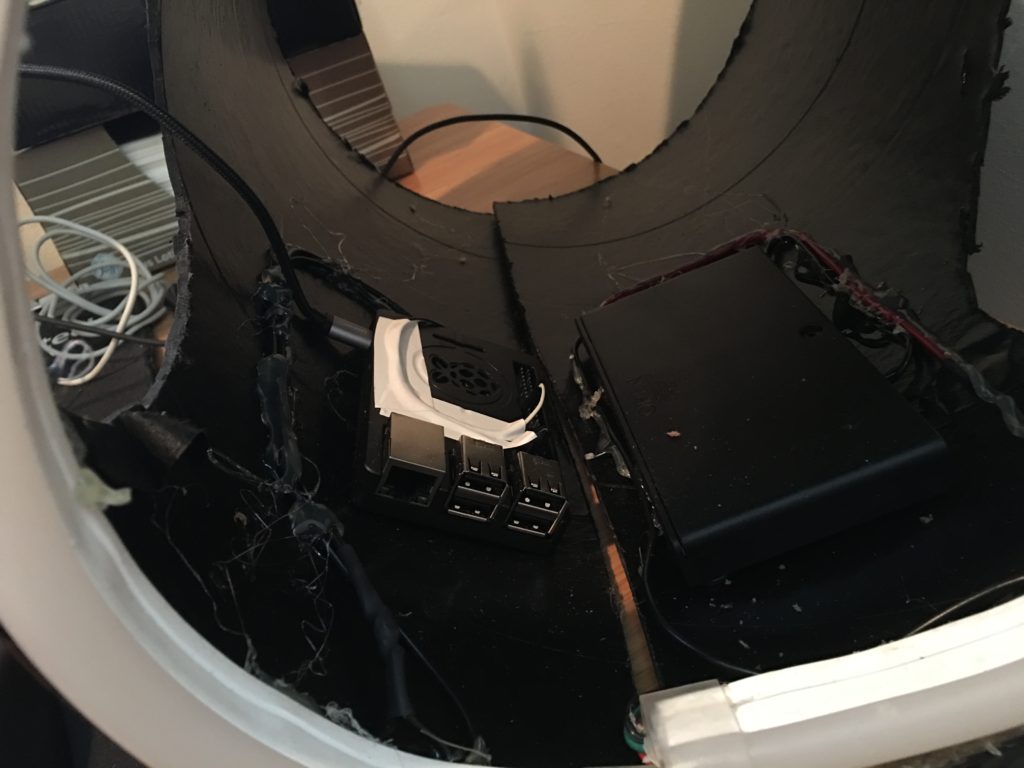
I slit the sonotube down the back so it could easily be taken on and off and hot glued all the components to the back of the sonotube and routed the wires around the inside edge of the LED strip which was also hotglued around the top edge. The small microphone was mounted to the face of the costume for optimal performance.
The final step was to attach two straps to the costume to act as a pair of internal suspenders and then I added about a half dozen adhesive foot warmers too keep everything cozy on a cold Halloween evening.
An excited 5-year-old on Halloween is a very difficult a client and luckily everything went smoothly. One adjustment I would have made was to dial down the brightness of the LEDs which kept blowing out my daughters night vision making it difficult for her to see. Finally, near the end of the evening, there was also a brilliant moment when my daughter, declaring that she just ‘couldn’t take it anymore’, stripped off the costume in frustration from the ceaseless stream of incoming Alexa commands.
